When it comes to home improvement of any kind, knowing where to start can be the most difficult part of the process, and many people can find themselves put off altogether by the perceived hard work they think it entails.

However, depending on the nature of the job at hand, most things can be planned out and made simpler by establishing a work list, choosing the right materials, and adopting the proper tools for the job.
One such example is installing baseboards in your home. But what exactly does the process entail, and which equipment should be used?
What Are Baseboards?
In architectural terms, baseboards are wooden or vinyl boarding used to cover up the lowest part of interior walls – giving them a neater appearance, and covering up the rough edges where the wall and floors meet.
Also known as ‘skirting boards’, ‘skirting’, ‘wainscotting’, and ‘mopboarding’, baseboards are commonly used in most homes in the western world, and serve all manner of purposes – from protecting the wall from abrasions, to covering uneven edges.
What Materials Do You Need?
When it comes to choosing the right materials, you need to take into account every stage of the process – factoring in the wood or vinyl itself, the nails or adhesive you are going to be attaching the baseboards with, and any additional materials you might need.
Nails
Generally speaking, you want somewhere between 1 ½ inch and 2 ½ inch nails when securing the baseboard to the bottom of the wall, as these can go through the (relatively thin) baseboard, and secure themselves into the wall without going too far inwards.
It is recommended that longer nails – that is, ones longer than 2 inches – are avoided, unless you know that you need deeper penetration for the baseboards and walls you are working with.
If you are at all unsure about the length of the nails you need, the first thing you should do is measure the thickness of the baseboard itself – as this will be your guide as to their length.
MDF
MDF, otherwise known as ‘medium density fiberboard’, is a common kind of wood used in most consumer products and furniture – including wardrobes, kitchen cupboards, and even shelves.
It is widely versatile to use, and most importantly it is cheap, meaning that it is very affordable, and perfect for home improvements and DIY projects.
MDF is one of the common baseboard materials, but there are others available.
Plastic
Some baseboards are made from plastics, such as vinyl or polyurethane. These can generally be given the appearance of wood, and are generally pretty cheap – due to the fact that they can be easily mass produced.
Inexpensive Soft Wood
There is also the option to have inexpensive soft woods like pine or poplar, and many people opt for these due to their long lasting durability and appearance. Whereas other materials like MDF can absorb moisture and show their age sooner, soft wood can be a good alternative for those seeking longevity.
Hard Wood
While this is uncommon in most conventional homes, there are some who opt for hard wooden baseboards made from woods like cherry or mahogany. However, these are more expensive, and do not offer enough benefits to warrant the extra cost.
What Tools Might You Need?
When it comes to the tools you need, these can include:
- A nail gun – for easy attachment to the wall
- A claw hammer for manually hammering nails
- A utility knife
- A pry bar to loosen existing baseboards
- A tape measure
- A pencil
- A hand saw for cutting the boards
How To Remove Existing Baseboards
If you already have baseboards in your home, then you will need to remove these to swap them out for the new ones. If this is the case in your home, then you need to be able to remove them without doing damage to the facade of the wall.
Step One
The first step is to take your utility knife and make a clean, neat cut along the top of the existing baseboard. This is to separate any paint or caulk that might be connecting the top of the board to the wall itself.
But cutting with your knife, you minimize the chance of causing damage to the wall, and you will give yourself proper purchase when removing it later.
Making a nice clean cut will just make the whole process much easier, and is better than just trying to rip the boarding off without any prep.
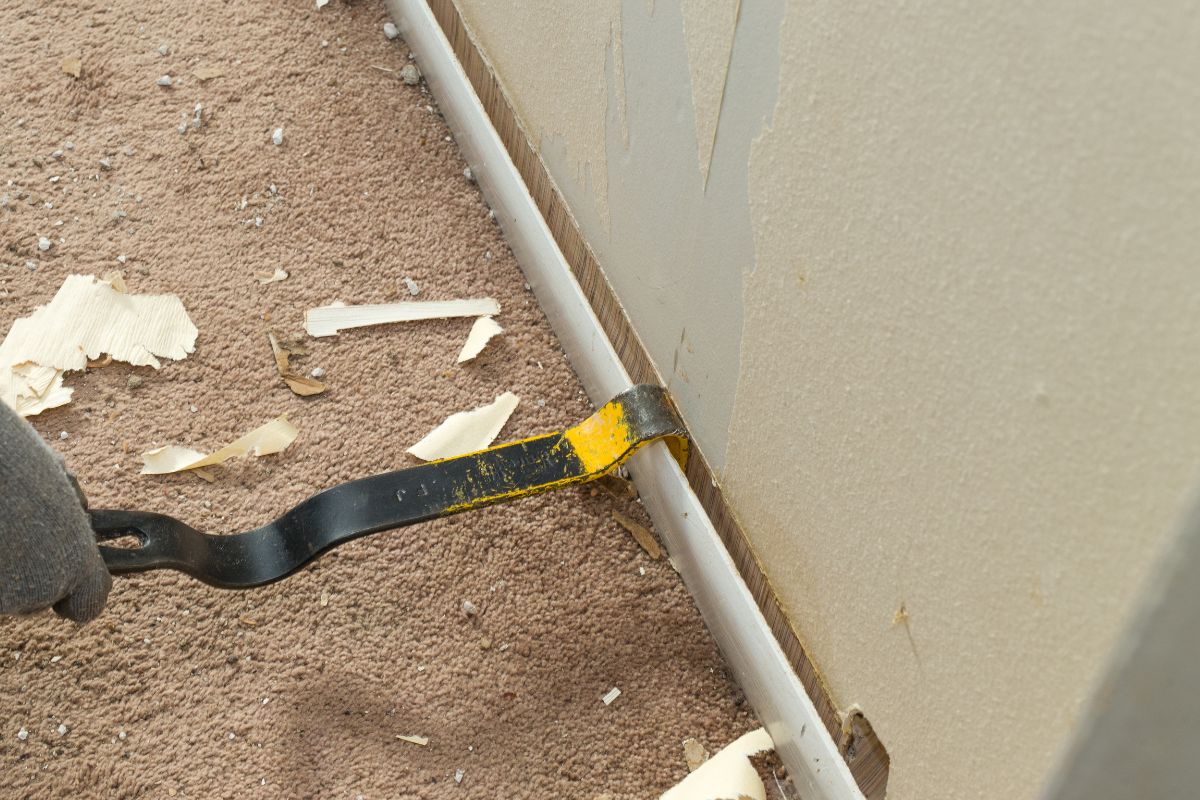
Step Two
Once you have done this, you can then work on removing the actual boards from the wall. It doesn’t matter whether you used nails or adhesive last time, the method of removal is the same.
This will involve the pry bar, but you will need to take care during the process to avoid causing undue damage to the wall itself – damage that, depending on the dimensions of your new boards, you may still see post-installation.
Begin by sliding the pry bar down the back of the boarding, being sure to go deep enough to give you proper purchase. You can then work your way across slowly, loosening the grip of the bonding agents or nails, and getting ready to begin working it loose from the wall.
With some elbow grease, this task shouldn’t take too long. Just remember, be firm but careful when doing this. No one wants a damaged wall.
Step Three
Next you need to scrape any adhesive or rough edges away, sanding them down so that you can get a close, smooth surface to attach the new boards. A smoother surface will make the bonding process easier (if you are using glue), and will ensure everything lines up correctly if you are using nails.
How To Install Baseboards In Your Home
Now that we have run through everything you might need, it is now time to go through the process, beginning with the pre-checks, and ending with the finished article.
So, without further ado, let’s get started!
Prep Work
Before you get started, you will need to ascertain how much wood you have, and how much wall space you need to cover.
You will also need to work out how many lengths you will need per wall, and where you will need to make amends with the hand saw. This will be the case on smaller walls – such as ones at the side of door frames, and as such proper measurements are important.
Step One
Once you have your lengths of baseboarding measured and cut, it is time to start the installation process.
To begin, measure and cut your corners, ensuring that they all fit together neatly and smoothly. This is by far the most complex part of the process, but it is also the most important part for the overall look of the space.
Bad corners will stick out like a sore thumb, so care is needed when measuring and cutting. This will unfortunately require a knowledge of math and angles – and for example if your corner is exactly 90 degrees, then each edge of the boarding needs to be cut at 45 degrees in the appropriate direction so that they fit together.
Unfortunately, no man made wall is usually 100% accurate – especially not in older homes – which means that some mental math might be required.
Step Two
Once you are happy with your measurements, and all the materials are prepped, you can now begin the assembly process – using finishing nails to attach the baseboard to the wall.
Begin in a corner of the room, putting two nails into each board. Don’t worry about nail holes, as these can be filled in with putty and smoothed over later on.
For boards on the outside of a row, be sure to use some wood adhesive before applying the nails, as this will ensure a secure and firm hold. This is not necessary for boards in the middle, and if they are properly measured, the exterior boards (and the nails) should hold them in place firmly enough.
Step Three
You can also install shoe molding and cap molding if necessary. These are great for adding extra protection, and for adding a sense of overall neatness. They are also generally fragile and thin, thus pin nails are the best way of holding them firm.
However, if the flooring is concrete, you might have to secure them to the baseboard itself, as pin nails are not strong enough to penetrate the concrete.
Step Four
Once you have successfully secured all of the baseboards onto the wall, you can then focus on filling and sealing any gaps and nail holes.
For the nail holes, you can use polyfiller – a cheap, readily available product that can be applied, left to harden, and then sanded smooth. These can then be touched up with wood stain, or with paint to disguise the blemishes.
For baseboarding that is in moist areas – such as beside a kitchen sink, or near a regularly used back door, then you should use caulk to waterproof any potential gaps.
This will help to create a tight seal, and prevent damage caused by cold and dampness further down the line.
Finishing Steps
Once you are happy with the arrangement – as well as the filled and sealed areas – the next step is to paint or stain the baseboarding. This will help add another layer of protection – not to mention disguise any blemishes caused by nail holes and cracks.
To do this, you should apply some masking tape across the point where the baseboard meets the floor, and at the top where it meets the wall. This will help protect your walls from paint, and will help you get a neater line all the way across.
The same goes for wood stain, and simply laying down some tape can save a lot of stress and irritation later on.
Apply the first coat of paint or stain, then allow it to dry for roughly 12-24 hours. Once dry, you can then apply a second coat if necessary.
Final Thoughts
And there we have it, everything you need to know about baseboards, and the best tools, equipment, and process to install them in your home.
It’s true that, when it comes to home improvement, even the simplest tasks can seem like a daunting undertaking. However, what this article shows is that, with the right tools for the job, and the right methods of approaching the task, you too can make the improvements you need without undue stress and effort.
So if you want to install baseboards into your home, be sure to follow the above mentioned methods!